
Custom Search
Showing posts with label crankbait modification. Show all posts
Showing posts with label crankbait modification. Show all posts
Tuesday, March 16, 2010
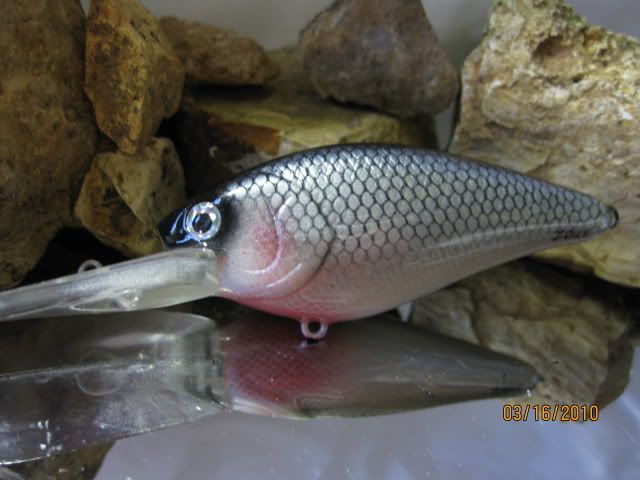
Natural Shiner
Ok, you might be getting tired of seeing my painted crankbaits, but I've not made it to the lake yet for any fishing reports. Besides, I really liked the look of this one. It's my version of a natural shiner painted on a Lucky Craft CBD20.
Thursday, March 11, 2010
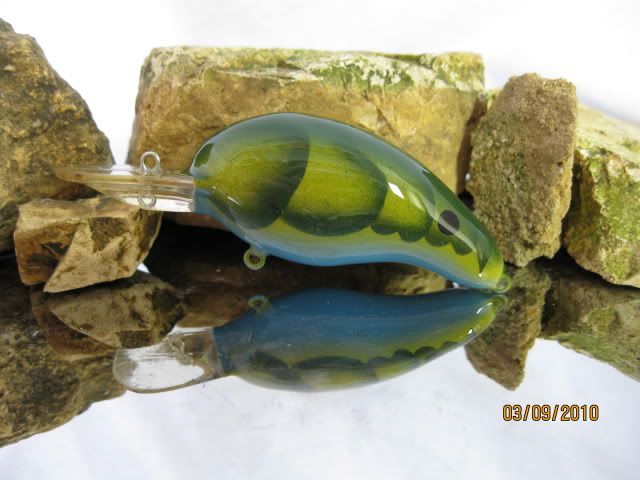
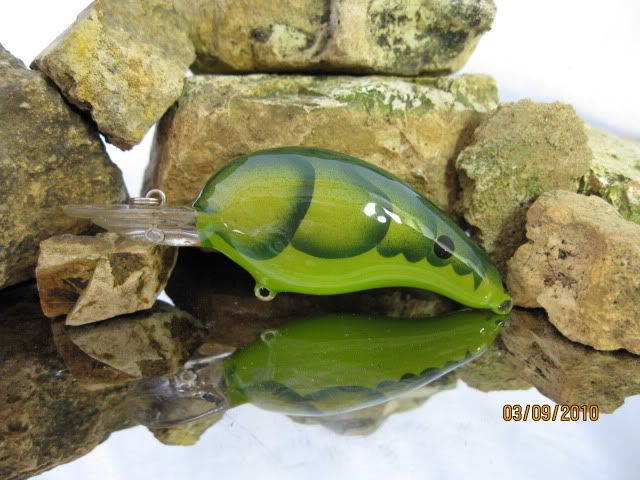
Olive Craws
Here's some Olive Craws I just painted for a customer. He requested the eyes be put on the back of the lure instead of the front. Comments welcome.

Friday, January 22, 2010
My Latest Creations
Here's some crankbaits I finished this week. Hope you enjoy! The top two are "Blue Mottled Craw" and "Mottled Spring Craw" and the bottom one is "Pesky Gill".


Saturday, January 16, 2010
Winter Pastime
I haven't been able to get on the water since Thanksgiving. It's just too cold and the days are too short for me! So, to pass the time I've been painting some crankbaits. I really enjoy making jigs and painting crankbaits, especially in the winter. It gives me something to do when I can't fish, lets my creative side play for awhile, and gets me really excited about getting back on the lake.
Winter is also a great time to spend quality time with my wife and son. She has understood my love of fishing since we met, so she doesn't nag at me during the warm months when I want to fish tournaments. I appreciate and love her more than words can explain. My son is growing fast and I've been taking time to soak it in. He's starting to talk well and is incredibly fun to play cars with! We like to crash them! Soon, he'll be old enough to go fishing with his old man on the boat. I know his mother is ready for it, because she misses going fishing too!
I thought I would post a few pictures here of my latest work. Keep in mind, I'm not a professional painter! I've been practicing with the airbrush and feel like I'm getting better every time I paint, though. The main thing is I enjoy it.
Have a great day and give thanks to Him!


Sunday, October 4, 2009
Crankbait Modification - Part 2 - Painting
People paint crankbaits using many different methods, tricks, and paints. I might not paint them the proper way according to some people, but it works for me. And, besides, I'm still learning! One day I decided to give it a try because I already have an airbrush, I have too many crankbaits not in use because I don't like th colors, and I am out of jig making materials right now. (The company I order jig supplies from is relocating and out of commission until October 12.) So, I will try to walk you through the steps I take when painting my crankbaits.
First, it is important to make sure the lure is smooth. If it's not, sand it until it is. Many wooden lures get chunks out of them through frequent use and these chunks can be filled in with wood putty. The most common flaw I find in plastic lures is grooves where the front hooks rub into the body during use. This can be fixed with any epoxy, but I prefer Devcon 2-ton. Also, be sure to tape off the lip and any other parts you don't want to get paint on. It's fine to paint over the hook hangers.
Second, you want to lay down a base coat to work from. For all practical purposes, this should be done with white. It allows you to see what you're spraying better and it also makes the colors brighter. The airbrush I use is a Badger Professional 150. Before you spray be sure to read the directions of both the paint and the airbrush. Different paint requires different reducers to spray properly. If this isn't done correctly, you will get splatters or an uneven design. Some paint can be reduced with distilled water, while others require paint thinner. I even have one that reduces best with Windex! I learned that from a seasoned painter at Hobby Town.
Once the basecoat is painted and had plenty of time to dry, you can start with your pattern. This is when you can use templates to make scale patterns, gills, or anything else you can think of. I normally use a scale pattern and if gills are required, I will freehand them. I made this simple tool out of some scrap wood and drywall mesh tape. It works great for scales.
![]()
![]()
Just hold it up to the lure and spray evenly as far down as you want the scales to show. Be sure not to move the template or the paint will smear. If that happens, it is best to start over with a new base coat. I always go back over a portion of the back (or top) of the lure with the same color I used for the scales, but without the template. This blends the colors and scales and it looks much better.
After you have all the colors you want on the bait, you can start painting the eyes and any other details. I use a nail to paint the black dots on the side of the lure and two different size nails for the eyes. I use the bigger nail for the main color of the eye such as red or yellow and I use a smaller nail to put a black dot in the middle.
![]()
![]()
The final step is to seal the lure and make it durable. I use Devcon 2-ton epoxy for this. It's very simple to use, dries quickly, and offers great protection. Mix it up and use a cheap brush to paint it on. I've also used a popsicle stick to put it on, but the brush is much easier. Glitter can be added to the epoxy while you mix it if desired. Once the epoxy is covering the entire lure body, hang it to dry. This is where the Devcon pays off, because it dries quickly enough that it doesn't run or leave globs on the lure. Slower drying epoxies require a drying machine to ensure it doesn't run. Some people use old rottisseries for drying the lures. As it spins, the epoxy doesn't have time to run.
![]()
![]()
![]()
First, it is important to make sure the lure is smooth. If it's not, sand it until it is. Many wooden lures get chunks out of them through frequent use and these chunks can be filled in with wood putty. The most common flaw I find in plastic lures is grooves where the front hooks rub into the body during use. This can be fixed with any epoxy, but I prefer Devcon 2-ton. Also, be sure to tape off the lip and any other parts you don't want to get paint on. It's fine to paint over the hook hangers.
Second, you want to lay down a base coat to work from. For all practical purposes, this should be done with white. It allows you to see what you're spraying better and it also makes the colors brighter. The airbrush I use is a Badger Professional 150. Before you spray be sure to read the directions of both the paint and the airbrush. Different paint requires different reducers to spray properly. If this isn't done correctly, you will get splatters or an uneven design. Some paint can be reduced with distilled water, while others require paint thinner. I even have one that reduces best with Windex! I learned that from a seasoned painter at Hobby Town.
Once the basecoat is painted and had plenty of time to dry, you can start with your pattern. This is when you can use templates to make scale patterns, gills, or anything else you can think of. I normally use a scale pattern and if gills are required, I will freehand them. I made this simple tool out of some scrap wood and drywall mesh tape. It works great for scales.


Just hold it up to the lure and spray evenly as far down as you want the scales to show. Be sure not to move the template or the paint will smear. If that happens, it is best to start over with a new base coat. I always go back over a portion of the back (or top) of the lure with the same color I used for the scales, but without the template. This blends the colors and scales and it looks much better.
After you have all the colors you want on the bait, you can start painting the eyes and any other details. I use a nail to paint the black dots on the side of the lure and two different size nails for the eyes. I use the bigger nail for the main color of the eye such as red or yellow and I use a smaller nail to put a black dot in the middle.


The final step is to seal the lure and make it durable. I use Devcon 2-ton epoxy for this. It's very simple to use, dries quickly, and offers great protection. Mix it up and use a cheap brush to paint it on. I've also used a popsicle stick to put it on, but the brush is much easier. Glitter can be added to the epoxy while you mix it if desired. Once the epoxy is covering the entire lure body, hang it to dry. This is where the Devcon pays off, because it dries quickly enough that it doesn't run or leave globs on the lure. Slower drying epoxies require a drying machine to ensure it doesn't run. Some people use old rottisseries for drying the lures. As it spins, the epoxy doesn't have time to run.
Here are the recent lures I painted. Clockwise from left, Norman DD22 in Citrus Shad, Bomber Fat Free Fingerling in Sexy Shad, and Bandit 100 in Citrus Shad.


Well, that's the way I paint crankbaits. I'm sure many of you can do a much better job, but I hope this can help some other beginners to not make as many mistakes as I have. If you have any tips or tricks, please feel free to leave them in the comment sections for everyone to see. Good luck out there and be safe!
Wednesday, August 5, 2009
Crankbait Modification - Part 1 - Getting More Depth
 Over the next few weeks, I will be discussing and providing examples of modifications anglers can make to their crankbaits to achieve better performance. There are many things one can do to turn an ordinary, mediocre, out of the package crankbait into a great fish catching tool. Perhaps the most common question I hear is, "How can I get my crankbait to run deeper?" So, this topic is going to be the first covered in this Crankbait Modification series.
One of the most important things in getting your crankbait deeper is to be sure it is tuned. Having a properly tuned lure is the basis for catching fish with it. If it's not tuned right, no amount of modifications is going to help. If you cast it out and notice during the retrieve that your line is moving to either the left or right, then your lure is not tuned properly. There are several reasons this could happen with the most common being a bent line tie and uneven lip. To fix a bent line tie is very easy but can be frustrating. Sometimes, you can adjust it too much and it will start running the opposite direction. I have found the easiest way to tweak lure direction is by taking a pair of needle nose pliers and placing one side on the line tie and the other on the side of the lure's lip and gently bend. You should bend the line tie in the direction that you want the lure to run. Photo 1 is an example of me tuning a Norman DD22 that has been custom painted. Do not apply too much force because you will break the lip! If the line tie doesn't bend easily, you will need to grip only the line tie with your pliers and bend. It may also be necessary to bend the front edge of the line tie to the right or left. Photo 2 shows an example of this.


Remember to make small adjustments and test before making any additional adjustments. Definitely take the time to learn how to do this because after catching several fish or getting your crankbait caught on the bottom a few times it will need to be tuned. Sometimes, the lip will crack or break. You can buy replacements from several sites on the internet, but I find it easier and less hassle to salvage the hooks and split rings and buy another lure.
 illing, sanding, or painting required. Just stick them on evenly on each side of the lure and you're ready to go. Placement of these on the lure depend on personal preferences. I like to put them on the bottom front just behind the lip to achieve a more vertical dive.
Some other ways to add weight are a little more time consuming. These include adding lead wire to your hook shanks, drilling into the crankbait and adding BBs (which also makes it louder), drilling into the lip of the lure and adding lead, and changing to different hooks.
To add lead wire, simply wrap it around the shanks of your treble hooks. If you do this to the front treble, it is more useful in getting your lure deeper.
Drilling into the crankbait involves drilling a small hole, but big enough to insert BBs, putting the BBs in, epoxy over the hole, sand, and repaint. This method is entirely too time consuming in my opinion. It also works better with plastic crankbaits.
Drilling into the lip of of a crankbait involves using a dremel tool to hollow out part of the center of the lip and inserting weight with epoxy. This is tricky and can easily throw the balance of the lure off if done incorrectly.
Changin g to different hooks is something I do on all my deep diving crankbaits. I prefer size 1 Owner Stingers 2x. They make up to a 4x, but I think that is overkill for bass fishing. The 2x is very strong, heavy and very hard to bend. The main reason I choose this hook is because it is much heavier than those on most factory packaged lures and has great holding power.
 g to different hooks is something I do on all my deep diving crankbaits. I prefer size 1 Owner Stingers 2x. They make up to a 4x, but I think that is overkill for bass fishing. The 2x is very strong, heavy and very hard to bend. The main reason I choose this hook is because it is much heavier than those on most factory packaged lures and has great holding power.
 Line size is another factor in getting your crankbait deeper. The lighter the line, the deeper the lure will go, which is due to line diameter. I wouldn't use any lighter than 8 lb test on a deep diving lure. There are too many things to break the lure off. With the cost of high quality crankbaits these days, I don't want to lose any more than necessary. In the past, I would use 10 or 12 lb monofilament because I liked the stretch provided. I feel this is best when using treble hooks. However, fluorocarbon line will get the lure deeper because it sinks. I have been experimenting with Berkley Professional Grade 100% Fluorocarbon and have been very pleased with it. You should make long casts which requires a longer rod. I prefer 7' to 7'6" rods for cranking. The farther the lure has to run, the deeper it will go. Lastly, use a slower ratio reel. I use a 6.3:1 and slow down my retrieve, but most pros prefer a 5.2:1. I just haven't brought myself to purchase one yet.
Another modification for getting more depth is to "shave" the front of your lure's lip. You must be careful to make it even. This allows the lip to slice through the water better, quickly achieving maximum depth. It also decreases the durability of the lip making it easier to break. To do this you need a good fine toothed file. Hold the lure in one hand and file the front of the lip at about a 60 degree angle.
Finally, here is a tip for those of you who want to get to the absolute depths of your lake. It's very simple. First, make a Carolina rig with a 1 1/2 or 2 oz weight. Then, tie your crankbait to the end instead of a plastic. This can be very effective when fish are deep because you can stop the retrieve and the crankbait will float right in their face. The bite can be hard to feel so pay attention. You can use any size crankbait for this because that heavy weight will take it to the bottom.
Hopefully, some of these tips will help you achieve the depths you desire. Some of these will require trial and error, but once you learn them they are very helpful. I recommend trying these modifications on some of your cheaper, least favorite lures until you get the hang of it. That's it for now. The next topic in this series will be about painting and color selection. Have a great day!
Subscribe to:
Posts (Atom)